
Impromptu aluminium glider
Robin Ford, March 2018
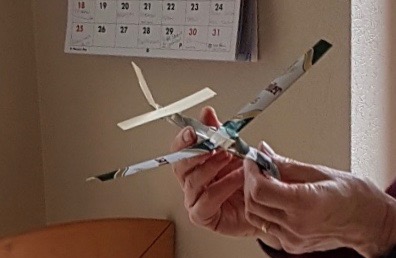
Previously we had made paper gliders like this one.

This time the girls and I flew miniature frisbees (details another time) and a made a glider mainly from a 500 ml aluminium beer can that I had picked up in a Luxembourg street. It was like this one.

I’ve designed many different aluminium-can gliders, of various degrees of complexity, but here I kept it simple.
When making aluminium gliders, the first task is the trickiest — removing the ends to reveal a curved sheet (about 140×200 mm for a 500 ml beer can, 100×200 mm for a 375 ml can).
Fortunately, we found a can opener which, with some fiddling, removed enough of the end to provide access for a pair of scissors, with which I cut off the rest of the end.
VITAL SAFETY MESSAGE Take extreme care when cutting the aluminium can. There are jagged edges that can cut your fingers.
VITAL HOME COMPOSURE MESSAGE Check that you are not using the household’s best scissors (for example dress-making scissors).
Assume that we now have the curved sheet.
To make the fuselage
- cut two 30 mm strips along the height of the can
- fold along the middle of the long dimension to give a ‘v’ shape (maybe 30 degrees)
- overlap the two ‘v’s and secure with sticky tape (both sides)
- expect a fuselage about 210 mm long. (500 ml beer can)
To make the wings
- cut another two 30 mm strips along the height of the can
- sticky tape the short ends together, ensuring the curvature is the same way up for both
- the wing will be about 280 mm long if from a beer can (200 mm if from a smaller can)
- put sticky tape on both sides to maximise rigidity

I usually find that the wing is twisted along its length, presumably from residual stresses left from the can-making process. I removed as much of this twist as I could– what was left I adjusted later.
We joined the wings to the fuselage by holding the items in place and sticky-taping them together. To get the ‘dihedral angle’ (the angle between the wings seen end-on) and stiffen up the wing root, we folded a piece of card over to give a ‘v’, put that upside down on top of the wing and sticky taped over it. With the wing attached to the fuselage we did the final adjustment of the ‘angle of attack’ (the angle the wing makes with the airflow, typically 6 degrees in these models).
The wings and fuselage were now done.
Because the aluminium was curved it was not suitable for tail-plane and fin, so we used thin card instead. We sticky-taped them both on. We stuck the fin onto the angled side of the fuselage, which we then bent into a more-or-less vertical position.
We added sticky putty to the nose, adjusting the amount until it flew best.
Although the aluminium is strong, it bends out of shape if it hits anything solid. After each flight we inspected it and, if necessary, carried out adjustments. We did this indoors at first.
Launching from an elevated house entrance gave a range of maybe 20 metres from a height of (say) 2.5 metres which I thought was ok.
Here are some details (all approximate):
- Aspect ratio 9
- Camber 11%
- Metal thickness 0.1 mm
- Surface density 300 g/m2
The camber is higher than I would like, but I’ve found it best not to fight the natural curvature of the aluminium. Of course, I could have made the wings narrower, but that somehow didn’t seem right either.
